First things first: here’s a list with the building materials:
 Conversion of measures to Imperial Units
| 0.5 m2 | chicara ripstop or icarex |
| 3 pcs | 1.5 meter carbon 2mm |
| 1 pc | 1 meter carbon 1.5mm |
| 3 m | bridle cord |
| 10 pcs | vinyl endcaps 2mm |
| 2 pcs | plastic endcaps 2mm for the wingtips (with a slot for the tensioning string) |
| a little bit of dacron | |
| isolationtape or superglue |
Well let’s begin building!!
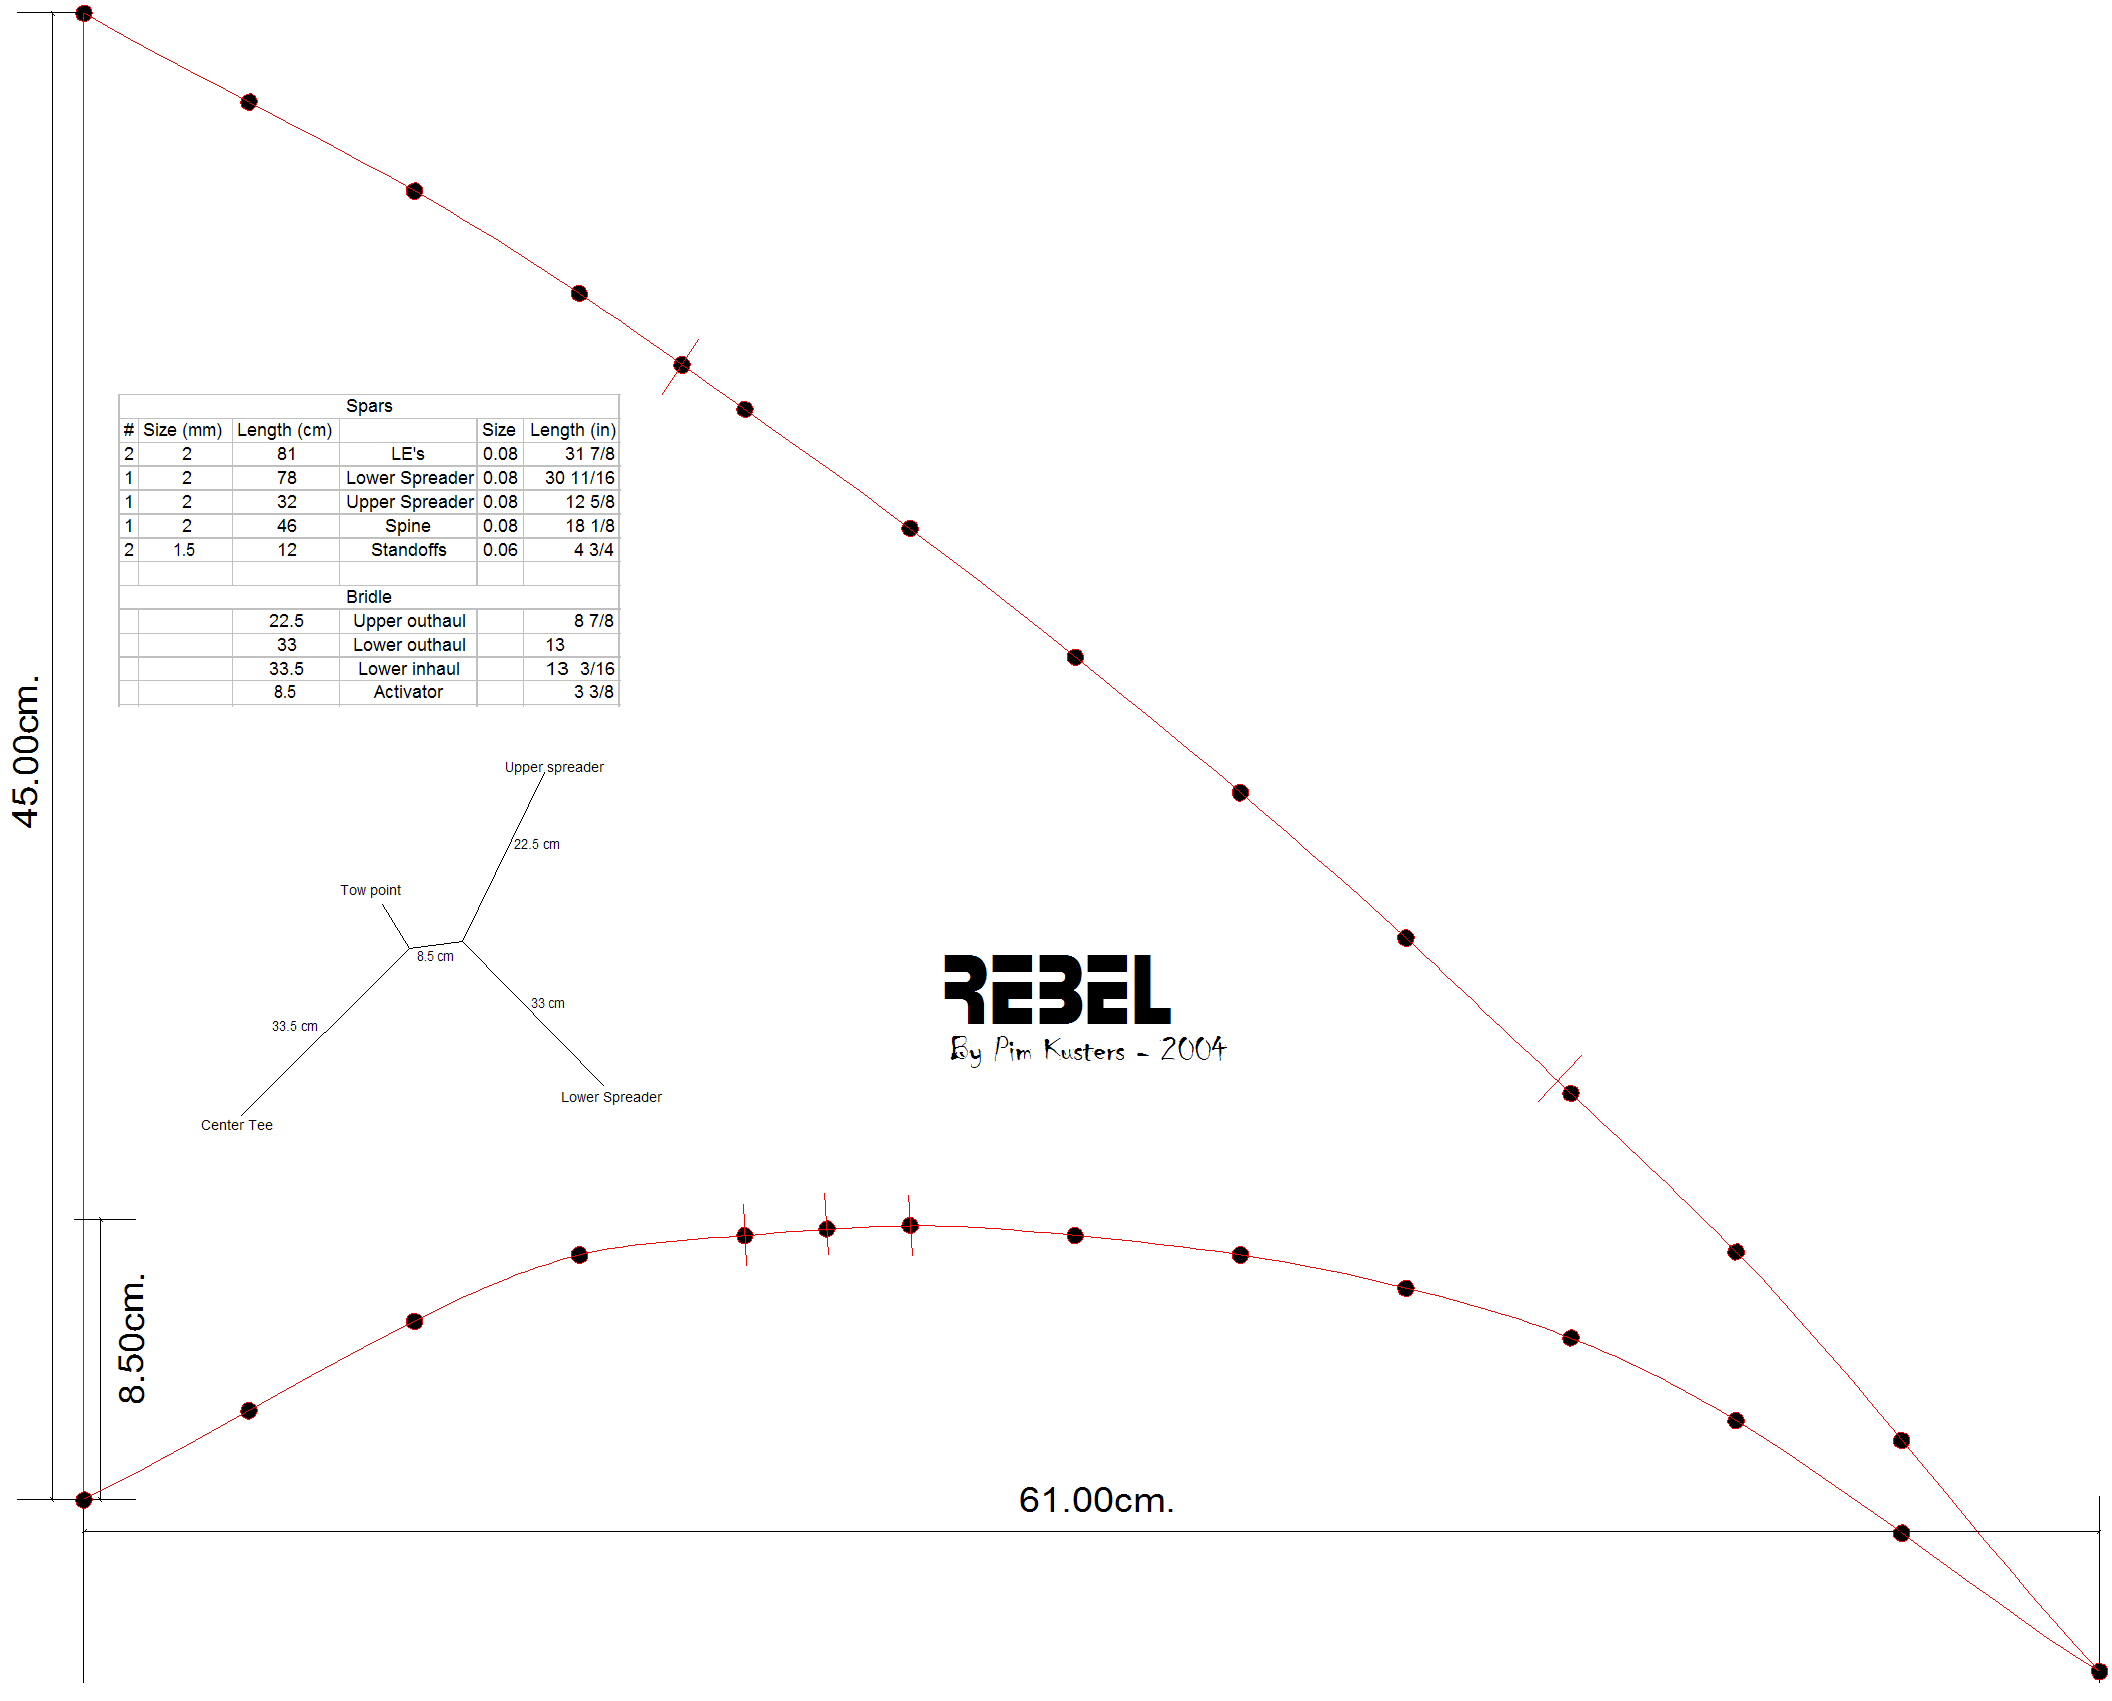
First you have to make some templates. The measurements for these can be found in the picture below:

You can also get the pattern in the following formats:
![]() Rebel pattern in PDF format
Rebel pattern in PDF format![]() Rebel pattern in Windows Meta-file(WMF) format
Rebel pattern in Windows Meta-file(WMF) format![]() Rebel pattern in Autocad DXF format
Rebel pattern in Autocad DXF format![]() Rebel pattern in Visio format
Rebel pattern in Visio format![]() Rebel pattern as JPG image
Rebel pattern as JPG image
First draw a raster of squares (5×5 cm) , then draw the line of the spine in this raster, Be sure to leave some space on the under side because the wingtips will be a little bit lower than the spine. Now you can set the waypoints for the curvature of the wing. The measurements are given every 5 cm starting from the spineside of the kite.
This is the distance of the lines AB and CD to the Leading edge and the Trailing edge in cm.
| line AB | line CD | |
|---|---|---|
| 0 | 0 | 0 |
| 5 | 2.7 | 3.4 |
| 10 | 5.4 | 5.9 |
| 15 | 8.5 | 7.4 |
| 20 | 12 | 8 |
| 25 | 15.6 | 8.3 |
| 30 | 19.5 | 8 |
| 35 | 23.6 | 7.4 |
| 40 | 28 | 6.4 |
| 45 | 32.7 | 4.9 |
| 50 | 37.5 | 2.4 |
| 55 | 43.2 | -1 |
| 61 | -5.2 |
The places for the gaps of the upper and lower spreader are both measured from the tip and the gap for the center hole is measured from the tail.
When you have made the templates (best out of cardboard) you can copy them onto your fabric. try to keep the grain alligned with the spine. The only place where you should keep some seam allowance is at the side of the spine ( 1cm ).
Start the construction by sewing the two halfs togetter at the spine side. use a striaight or a zigzag stitch.. Then take the fabric and cut out two pieces of 2cm by 80 cm. These will be used as LE tunnels. Fold them and sew them on the leading edges.
Next cut out two pieces of 1cm by 80 cm fold these over the TE and sew them in. Nowtake a piece of dacron of about 4×4 cm fold it and sew it in as nose section leaving room for the wing spars and the spine spar.. Take another piece of dacron of 6×1 cm, fold it double so it will look like 3×1. Fold this one over the tail and sew it in it’s place with a straight stitch creating a tunnel for the spine.
take two other pieces of dacron (4×1 cm) and fold it once in the length and then once in the other direction creating sort of a loop. Sew these in at the wingtips, these will be used for the tensioning strings.
The last pieces of darcon will be used as reinforcements of the whiskers. take two pieces of 2×4 cm, fold them over the TE at 22.5 cm from the spine.
Now make the holes for the upper and lower spreader, the center hole and small holes for the whiskers.
Framing the rebel
Cut the spars so you will have the following pieces:
| 2x | 2 mm | 81 cm | for the LE’s |
| 1x | 2 mm | 78 cm | for the Lower spreader |
| 1x | 2 mm | 32 cm | for the upper spreader |
| 1x | 2 mm | 46 cm | for the spine |
| 2x | 1.5 mm | 12 cm | for the whiskers |
Now u have to make some holes in the vinyl end caps. I used a soldering iron for this, but you can also use a hot needle.
Take 6 of them and make two holes a the end so you can stick a spar trough it (A). Take two other ones and take a bit out of the side of it (look at the pictures at the bottom of the page)(B) .Take 1 and. make 4 holes in it so you can stick 2 spars trough it creating a cross(C).
Start by putting an endcap on the bottom side of the spar you’re using for the spine and also lide end cap C on. Put the spine in it’s place by sticking it in the nose piece and then bending it a bit and stick it in the tail reinforcement.
Now you can put the LE’s in. Slide two endcaps A on them at the holes for the spreaders, also put the two plastic end caps on the tips and add the tensioning wire.
Take the lower spreader and slide it trough the C endcap that’s allready mounted on the spine. Take two A endcaps and slide them on. Now you can mount the lower spreader in the connectors on the LE and you can also put the upper spreader in it’s place.
Now take the two whiskers and thicken them on the end with some tape so they will fit the 2mm endcaps. stick them in the A endcaps that are on the Lower spreader and take the two B endcaps. Put them on half way and then stick the whisker through the dacron reinforcements on the other side you can put the rest of the endcap on..

And here is the bridle …

CAUTION!!!
There will be an update soon, because the kite still has a tendancy to stay in a backflip position.
I will overcome this problem by adding a little bit of weight to the spine. The kite flies great as it is, but this will improve it’s trickability.
Have Fun Building !!!!